
代理服务器(Proxy)主要是用户有因特网数据要求时,Proxy会帮用户去向目的地取得用户所需要的数据。
Proxy获取信息的工作流程
- 当Proxy的缓存拥有用户所想要的数据时
- Client端向Server端发送一个数据需求数据包。
- Server端接收后,先比对这个数据包的来源与预计要前往的目标网站是否为可接受?如果来源与目标合法,或者说,来源与目标网站Proxy都能帮忙取得数据时,那么Server端会开始替Client取得数据。
- Server首先会检查自己缓存数据,如果有Client所需的数据,那就将数据取出,而不经过向Internet要求数据的程序。
- 最后将数据发送给Client端。
- 当Proxy的缓存没有用户所想要的数据时
- Client端向Server端发送一个数据需求数据包。
- Server端接收后,开始进行数据比对。
- Server发现缓存并没有Client所需要的数据时,准备前往因特网获取数据。
- Server开始向Internet发送要求与取得相关数据。
- 最后将数据回送给Client端。
Proxy服务器可以作为上层代理,起到一定的分流作用。目前大部分Proxy已经停止对外开,仅针对自己网段内的用户提供服务。如果要自行设置Proxy,需要到当初申请的ISP搜寻一下,才能有效的设置好服务器。否则,设置错误的话,上层Proxy根本不提供服务。
代理服务器与NAT服务器的差异
NAT服务器的功能
NAT的主要功能是通过数据包过滤的方式,并使用iptables的nat表格进行IP伪装(SNAT),让客户端自行前往因特网上的任何地方的一种方式。主要的运作行为是在OSI七层协议的二、三、四层。由于是通过数据包过滤与伪装,因此客户端可以使用的端口号码(第四层)弹性较大。Proxy服务器的功能
通过Proxy的服务程序(daemon)提供网络代理的任务,因此Proxy能不能进项某些工作,与该服务的程序功能有关。
由上可知:NAT服务器是由较底层的网络去进行分析的工作。Proxy则主要是由一个daemon的功能实现的,所以必须要符合该daemon的需求,才能实现某些功能。
搭建代理服务器的用途与优缺点
用途
- 作为WWW的网页数据获取代理人。
- 作为内部局域网的单点对外防火墙系统。
优点
- 节省单点对外的宽带网络,降低网络负载。
- 以较短的路径取得网络数据,有网络加速的感觉。
- 通过上层代理服务器的辅助,达到自动数据分流的效果。
- 提供防火墙内部的计算机连上Internet。
- 缺点
- 容易被内部局域网的人员滥用。
- 需要较高的配置技巧与排错程序。
- 可能会取得旧的错误数据。
架设代理服务器的条件
- Client端用户不少,而且大部分仅需要WWW这个网路服务而已。
- Proxy还兼做防火墙的任务
- Client端常常需要连接到传输速度很慢的网站。
- Client端常常浏览的网站是静态网站,而不是动态网站
Proxy搭建
在centos中我用squid软件,在命令窗口执行安装
yum install squid进入squid的配置目录(/etc/squid/)可以看到有以下配置文件
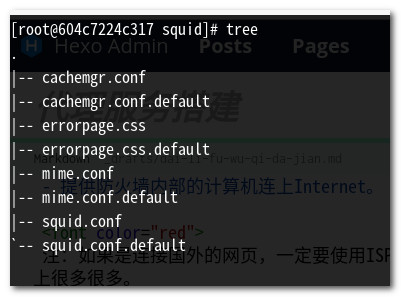
squid.conf是主要配置文件,所有squid需要的设置都是放在这个文件当中的
mime.conf是设置squid支持Internet上面的文件格式,默认配置就够了,一般不需要更改。
/usr/sbin/squid 提供squid的主程序
/var/spool/squid 默认的squid缓存存储目录
/usr/lib64/squid 提供squid额外的控制模块
在centos中默认的squid特色
- 仅有本机来源可以使用这个squid功能。
- squid所监听的Proxy服务端口在port 3128。
- 缓存目录所在的位置在/var/spool/squid/,且仅有100MB的磁盘高速缓存量。
- 除了squid程序所需要的基本内存之外,尚提供8MB的内存来给热门文件缓存在内存中。
- 默认启动squid程序的用户为squid这个账号。
squid.conf配置文件
     #
     # Recommended minimum configuration:
     #

     # Example rule allowing access from your local networks.
     # Adapt to list your (internal) IP networks from where browsing
     # should be allowed
     # 信任用户与目标控制,定义可能使用proxy的外部用户(内网)
     acl localnet src 10.0.0.0/8    # RFC1918 possible internal network
     acl localnet src 172.16.0.0/12    # RFC1918 possible internal network
     acl localnet src 192.168.0.0/16    # RFC1918 possible internal network
     acl localnet src fc00::/7       # RFC 4193 local private network range
     acl localnet src fe80::/10      # RFC 4291 link-local (directly plugged) machines

     # 定义可取得的数据端口
     acl SSL_ports port 443
     acl Safe_ports port 80        # http
     acl Safe_ports port 21        # ftp
     acl Safe_ports port 443        # https
     acl Safe_ports port 70        # gopher
     acl Safe_ports port 210        # wais
     acl Safe_ports port 1025-65535    # unregistered ports
     acl Safe_ports port 280        # http-mgmt
     acl Safe_ports port 488        # gss-http
     acl Safe_ports port 591        # filemaker
     acl Safe_ports port 777        # multiling http
     acl CONNECT method CONNECT

     #
     # Recommended minimum Access Permission configuration:
     #
     # Deny requests to certain unsafe ports
     # 拒绝非正规的端口连接要求
     http_access deny !Safe_ports

     # Deny CONNECT to other than secure SSL ports
     # 拒绝非正规的加密端口连接要求
     http_access deny CONNECT !SSL_ports

     # Only allow cachemgr access from localhost
     # 放行管理本机的功能
     http_access allow localhost manager

     # 其他管理来源都予以拒绝
     http_access deny manager

     # We strongly recommend the following be uncommented to protect innocent
     # web applications running on the proxy server who think the only
     # one who can access services on "localhost" is a local user
     #http_access deny to_localhost

     #
     # INSERT YOUR OWN RULE(S) HERE TO ALLOW ACCESS FROM YOUR CLIENTS
     #

     # Example rule allowing access from your local networks.
     # Adapt localnet in the ACL section to list your (internal) IP networks
     # from where browsing should be allowed
     # 放行内部网络的用户来源
     http_access allow localnet

     # 放行本机的使用
     http_access allow localhost

     auth_param basic program /usr/lib64/squid/basic_ncsa_auth /etc/squid/passwd
     auth_param basic children 5
     auth_param basic realm hehe
     auth_param basic credentialsttl 2 hours
     acl myproxy proxy_auth REQUIRED
     http_access allow myproxy

     # And finally deny all other access to this proxy
     # 全部予以拒绝
     http_access deny all

     # Squid normally listens to port 3128
     # 默认监听客户端要求的端口
     http_port 3128

     # Uncomment and adjust the following to add a disk cache directory.
     # 磁盘高速缓存,即放置缓存数据的目录所在与相关设置
     cache_dir ufs /var/spool/squid 100 16 256

     # Leave coredumps in the first cache dir
     coredump_dir /var/spool/squid

     #隐藏真实IP变成匿名ip
     via off
     forwarded_for delete
     #
     # Add any of your own refresh_pattern entries above these.
     #
     refresh_pattern ^ftp:        1440    20%    10080
     refresh_pattern ^gopher:    1440    0%    1440
     refresh_pattern -i (/cgi-bin/|\?) 0    0%    0
     refresh_pattern .        0    20%    4320
以上配置好后关闭squid
systemctl stop squid.service
执行初始化缓存
squid -z
启动squid
systemctl start squid.service
squid加入开机启动
systemctl enable squid.service
需要添加密码认证的就不做介绍了,如果想验证是否成功,可以通过浏览器代理或者本地代理验证操作。