
What is HAProxy
HAProxy is a free load balancing software that can run on most mainstream Linux operating systems.
HAProxy provides both L4 (TCP) and L7 (HTTP) load balancing capabilities, with a rich feature set.
HAProxy’s community is very active and releases come quickly (the latest stable version 1.7.2 was released on 2017/01/13). Most importantly, HAProxy offers performance and stability comparable to commercial load balancers.
Because of these advantages, HAProxy is not only the first choice among free load balancing software, but has almost become the only choice.
Core features of HAProxy
- Load balancing: two modes, L4 and L7, supporting a rich set of algorithms such as RR/static RR/LC/IP Hash/URI Hash/URL_PARAM Hash/HTTP_HEADER Hash
- Health checks: supports both TCP and HTTP health check modes
- Session persistence: for application clusters that have not implemented session sharing, session persistence can be achieved via Insert Cookie/Rewrite Cookie/Prefix Cookie, as well as the various Hash methods mentioned above
- SSL: HAProxy can parse the HTTPS protocol and can decrypt requests into HTTP before transmitting them to the backend
- HTTP request rewriting and redirection
- Monitoring and statistics: HAProxy provides a Web-based statistics page that shows health status and traffic data. Based on this feature, users can develop monitoring programs to watch HAProxy’s status
Key characteristics of HAProxy
Performance
- It uses a single-threaded, event-driven, non-blocking model, reducing the cost of context switching, and can handle hundreds of requests within 1ms. Each session also occupies only a few KB of memory.
- A large number of fine-grained performance optimizations, such as an O(1)-complexity event checker, lazy update techniques, single-buffering, zero-copy forwarding and so on. These techniques let HAProxy use extremely little CPU under moderate load.
- HAProxy makes heavy use of the operating system’s own features, allowing it to deliver extremely high performance when handling requests. Typically, HAProxy itself accounts for only 15% of the processing time, while the remaining 85% is completed in the system kernel.
- Eight years ago (2009), the author of HAProxy ran a test with version 1.4: a single HAProxy process broke through 100,000 requests/second and easily saturated 10Gbps of network bandwidth.
Stability
As a program recommended to run in single-process mode, HAProxy has very strict stability requirements. According to the author, HAProxy has never had a bug that would cause it to crash in 13 years. Once HAProxy starts successfully, it will not crash unless the operating system or hardware fails (I think there’s probably some exaggeration in there).
As mentioned above, most of HAProxy’s work is done in the operating system kernel, so HAProxy’s stability mainly depends on the operating system. The author recommends using a 2.6 or 3.x Linux kernel, finely tuning the sysctls parameters, and making sure the host has enough memory. That way HAProxy can run continuously at full load for years.
Personal suggestions:
Use a Linux operating system with a 3.x kernel to run HAProxy
Do not deploy other applications on the host running HAProxy, so as to ensure HAProxy has exclusive use of resources and to avoid other applications causing operating system or host failures
Equip HAProxy with at least one standby machine to handle sudden events such as host hardware failure or power loss (how to build an active-active HAProxy setup is described later in this article)
Recommended sysctl settings (not a universal configuration — finer adjustments still need to be made for specific situations, but it can serve as an initial configuration when using HAProxy for the first time):
net.ipv4.tcp_tw_reuse = 1
net.ipv4.ip_local_port_range = 1024 65023
net.ipv4.tcp_max_syn_backlog = 10240
net.ipv4.tcp_max_tw_buckets = 400000
net.ipv4.tcp_max_orphans = 60000
net.ipv4.tcp_synack_retries = 3
net.core.somaxconn = 10000
Installing and running HAProxy
Below is how to install and run the latest stable version of HAProxy (1.7.2) on CentOS 7.
Installation
Create a user and user group for HAProxy. In this example both the user and the user group are “ha”. Note that if you want HAProxy to listen on ports below 1024, it needs to be started as the root user.
Download and extract
  wget http://www.haproxy.org/download/1.7/src/haproxy-1.7.2.tar.gz
  tar -xzf haproxy-1.7.2.tar.gz
Compile and install
  make PREFIX=/home/ha/haproxy TARGET=linux2628
  make install PREFIX=/home/ha/haproxy
PREFIX is the specified installation path, while TARGET is specified according to the current operating system kernel version:
- linux22     for Linux 2.2
- linux24     for Linux 2.4 and above (default)
- linux24e    for Linux 2.4 with support for a working epoll (> 0.21)
- linux26     for Linux 2.6 and above
- linux2628   for Linux 2.6.28, 3.x, and above (enables splice and tproxy)
In this example, our operating system kernel version is 3.10.0, so TARGET is specified as linux2628.
Create the HAProxy configuration file
mkdir -p /home/ha/haproxy/conf
vi /home/ha/haproxy/conf/haproxy.cfg
First let’s create a minimal configuration file:
global #global attributes
    daemon  #run in the background as a daemon
    maxconn 256  #maximum of 256 simultaneous connections
    pidfile /home/ha/haproxy/conf/haproxy.pid  #file in which to store the HAProxy process ID

defaults #default parameters
    mode http  #http mode
    timeout connect 5000ms  #timeout for connecting to the server side: 5s
    timeout client 50000ms  #client response timeout: 50s
    timeout server 50000ms  #server side response timeout: 50s

frontend http-in #frontend service http-in
    bind *:8080  #listen on port 8080
    default_backend servers  #forward requests to the backend service named "servers"

backend servers #backend service servers
    server server1 127.0.0.1:8000 maxconn 32  #the backend servers group has only one backend service, named server1, running on port 8000 of this machine; HAProxy opens at most 32 connections to this service at the same time
Note: HAProxy requires the system’s ulimit -n parameter to be greater than [maxconn*2+18]. When setting a large maxconn, remember to check and modify the ulimit -n parameter.
Register HAProxy as a system serviceAdd a start/stop script for the HAProxy service under the /etc/init.d directory:
vi /etc/init.d/haproxy

#! /bin/sh
set -e

PATH=/sbin:/bin:/usr/sbin:/usr/bin:/home/ha/haproxy/sbin
PROGDIR=/home/ha/haproxy
PROGNAME=haproxy
DAEMON=$PROGDIR/sbin/$PROGNAME
CONFIG=$PROGDIR/conf/$PROGNAME.cfg
PIDFILE=$PROGDIR/conf/$PROGNAME.pid
DESC="HAProxy daemon"
SCRIPTNAME=/etc/init.d/$PROGNAME

# Gracefully exit if the package has been removed.
test -x $DAEMON || exit 0

start()
{
       echo -e "Starting $DESC: $PROGNAME\n"
       $DAEMON -f $CONFIG
       echo "."
}

stop()
{
       echo -e "Stopping $DESC: $PROGNAME\n"
       haproxy_pid="$(cat $PIDFILE)"
       kill $haproxy_pid
       echo "."
}

restart()
{
       echo -e "Restarting $DESC: $PROGNAME\n"
       $DAEMON -f $CONFIG -p $PIDFILE -sf $(cat $PIDFILE)
       echo "."
}

case "$1" in
 start)
       start
       ;;
 stop)
       stop
       ;;
 restart)
       restart
       ;;
 *)
       echo "Usage: $SCRIPTNAME {start|stop|restart}" >&2
       exit 1
       ;;
esac

exit 0
Running
Start, stop and restart
service haproxy start
service haproxy stop
service haproxy restart
Adding logs
HAProxy does not output file logs directly, so we need to rely on Linux’s rsyslog to make HAProxy output logs.
Modify haproxy.cfg
In the global and defaults sections, add:
global
    ...
    log 127.0.0.1 local0 info
    log 127.0.0.1 local1 warning
    ...

defaults
    ...
    log global
    ...
This means pushing info-level (and above) logs to rsyslog’s local0 facility, pushing warn-level (and above) logs to rsyslog’s local1 facility, and having all frontends use the log configuration from global by default.
Note: info-level logs print every request HAProxy handles, which takes up a lot of disk space. In a production environment, it is recommended to set the log level to notice.
Add the haproxy log configuration for rsyslog
  vi /etc/rsyslog.d/haproxy.conf
  $ModLoad imudp
  $UDPServerRun 514
  $FileCreateMode 0644  #permissions of the log file
  $FileOwner ha  #owner of the log file
  local0.*     /var/log/haproxy.log  #log output file corresponding to the local0 facility
  local1.*     /var/log/haproxy_warn.log  #log output file corresponding to the local1 facility
Modify rsyslog’s startup parameters
  vi /etc/sysconfig/rsyslog
  # Options for rsyslogd
  # Syslogd options are deprecated since rsyslog v3.
  # If you want to use them, switch to compatibility mode 2 by "-c 2"
  # See rsyslogd(8) for more details
  SYSLOGD_OPTIONS="-c 2 -r -m 0"
Restart rsyslog and HAProxy
service rsyslog restart
service haproxy restart
At this point you should be able to see haproxy’s log files in the /var/log directory.
Log rotation with logrotate
Logs output through rsyslog are not rotated, so we need to rely on Linux’s logrotate (see “Introduction to the Linux Logrotate Service”) to do the rotation work.
As the root user, create the haproxy log rotation configuration file:
  mkdir /root/logrotate
  vi /root/logrotate/haproxy
  /var/log/haproxy.log /var/log/haproxy_warn.log {  #the two file names to rotate
      daily        #rotate daily
      rotate 7     #keep 7 copies
      create 0644 ha ha  #permissions, user, user group of the newly created file
      compress     #compress old logs
      delaycompress  #delay compression by one day
      missingok    #ignore errors when the file does not exist
      dateext      #append a date suffix to old logs
      sharedscripts  #the post-rotation restart script runs only once
      postrotate   #after rotation, run the script to reload rsyslog so it writes logs to the new log files
        /bin/kill -HUP $(/bin/cat /var/run/syslogd.pid 2>/dev/null) &>/dev/null
      endscript
  }
And configure it to run in crontab:
0 0 * * * /usr/sbin/logrotate /root/logrotate/haproxy
- Building an L7 load balancer with HAProxy
Overall plan
In this section we will use HAProxy to build an L7 load balancer that applies the following features
- Load balancing
- Session persistence
- Health checks
- Forwarding to different backend clusters based on URI prefix
- Statistics page
The architecture is as follows:
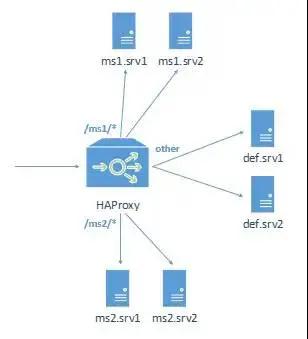
The architecture has 6 backend services in total, divided into 3 groups of 2 services each:
- ms1: serves requests whose URI prefix is ms1/
- ms2: serves requests whose URI prefix is ms2/
- def: serves all other requests
Building the backend services
Deploy 6 backend services; any Web service can be used, such as Nginx, Apache HTTPD, Tomcat, Jetty, etc. The specific installation process for the Web service is omitted.
In this example, we installed 3 Nginx instances on each of the two hosts 192.168.8.111 and 192.168.8.112:
ms1.srv1 - 192.168.8.111:8080
ms1.srv2 - 192.168.8.112:8080
ms2.srv1 - 192.168.8.111:8081
ms2.srv2 - 192.168.8.112:8081
def.srv1 - 192.168.8.111:8082
def.srv2 - 192.168.8.112:8082
Deploy a health check page, healthCheck.html, on each of these 6 Nginx services; the page content can be anything. Make sure the page is reachable at http://ip:port/healthCheck.html
Next, deploy the service pages on the 6 Nginx services:
- Deploy ms1/demo.html in the first group
- Deploy ms2/demo.html in the second group
- Deploy def/demo.html in the third group
The content of demo.html, taking the one deployed on 192.168.8.111:8080 as an example:
Hello! This is ms1.srv1!
The one deployed on 192.168.8.112:8080 should be
Hello! This is ms1.srv2!
And so on.
Building HAProxy
Install HAProxy on the host 192.168.8.110. The installation and configuration steps for HAProxy are as described in the previous chapter, so they are omitted here.
HAProxy configuration file:
global
    daemon
    maxconn 30000   #ulimit -n must be at least 60018
    user ha
    pidfile /home/ha/haproxy/conf/haproxy.pid
    log 127.0.0.1 local0 info
    log 127.0.0.1 local1 warning

defaults
    mode http
    log global
    option http-keep-alive   #use keepAlive connections
    option forwardfor        #record the client IP in the X-Forwarded-For header
    option httplog           #enable httplog; HAProxy will record richer request information
    timeout connect 5000ms
    timeout client 10000ms
    timeout server 50000ms
    timeout http-request 20000ms    #timeout from connection creation until a complete HTTP request has been read from the client; used to avoid DoS-like attacks
    option httpchk GET /healthCheck.html    #define the default health check policy

frontend http-in
    bind *:9001
    maxconn 30000                    #define the maxconn on this port
    acl url_ms1 path_beg -i /ms1/    #define an ACL; when the uri starts with /ms1/, the ACL[url_ms1] is true
    acl url_ms2 path_beg -i /ms2/    #same as above, url_ms2
    use_backend ms1 if url_ms1       #when [url_ms1] is true, direct to the backend service group ms1
    use_backend ms2 if url_ms2       #when [url_ms2] is true, direct to the backend service group ms2
    default_backend default_servers  #in other cases, direct to the backend service group default_servers

backend ms1    #define the backend service group ms1
    balance roundrobin    #use the RR load balancing algorithm
    cookie HA_STICKY_ms1 insert indirect nocache    #session persistence policy: insert a cookie named "HA_STICKY_ms1"
    #define the backend server [ms1.srv1]; when a request is directed to this server, the cookie value [ms1.srv1] is written into the response
    #set maxconn for this server to 300
    #apply the default health check policy; health check interval and timeout are 2000ms, two successes mark the node as UP, three failures mark the node as DOWN
    server ms1.srv1 192.168.8.111:8080 cookie ms1.srv1 maxconn 300 check inter 2000ms rise 2 fall 3
    #same as above; inter 2000ms rise 2 fall 3 are the default values and can be omitted
    server ms1.srv2 192.168.8.112:8080 cookie ms1.srv2 maxconn 300 check

backend ms2    #define the backend service group ms2
    balance roundrobin
    cookie HA_STICKY_ms2 insert indirect nocache
    server ms2.srv1 192.168.8.111:8081 cookie ms2.srv1 maxconn 300 check
    server ms2.srv2 192.168.8.112:8081 cookie ms2.srv2 maxconn 300 check

backend default_servers    #define the backend service group default_servers
    balance roundrobin
    cookie HA_STICKY_def insert indirect nocache
    server def.srv1 192.168.8.111:8082 cookie def.srv1 maxconn 300 check
    server def.srv2 192.168.8.112:8082 cookie def.srv2 maxconn 300 check

listen stats    #define the statistics page
    bind *:1080                   #bind port 1080
    stats refresh 30s             #refresh the statistics every 30 seconds
    stats uri /stats              #uri for accessing the statistics page
    stats realm HAProxy\ Stats    #authentication prompt of the statistics page
    stats auth admin:admin        #username and password of the statistics page
Once the modifications are done, start HAProxy
service haproxy start
Testing
First, visit the statistics page at http://192.168.8.110:1080/stats and enter the username and password when prompted.
Then you can see the statistics page:

The statistics page lists all the frontend and backend services we configured, along with their detailed metrics. Such as connection counts, queue status, session rate, traffic, the health status of backend services, and so on.
Next, let’s test the features configured in HAProxy one by one.
Health checks
Whether the health check configuration is correct can be seen directly from the statistics page. In the figure above you can see that the Status of all 6 backend services under backend ms1, ms2 and default_servers is 20h28m UP, meaning the healthy state has lasted 20 hours and 28 minutes, while LastChk showing L7OK/200 in 1ms means an L7 health check (that is, a health check via HTTP request) was performed 1ms ago and returned status code 200.
Now let’s rename healthCheck.html in ms1.srv1
mv healthCheck.html healthCheck.html.bak
Then look at the statistics page again:

The status of ms1.srv1 becomes 2s DOWN, and LastChk shows L7STS/404 in 2ms, meaning the last health check returned 404. Restore healthCheck.html, and you will soon see ms1.srv1 return to UP status.
Forwarding requests by URI prefix: visit http://192.168.8.110:9001/ms1/demo.html

You can see it was successfully directed to ms1.srv1.
Visit http://192.168.8.110:9001/ms2/demo.html :

Load balancing and session persistence policies
After visiting ms1/demo.html, ms2/demo.html and m3/demo.html separately, look at the browser’s cookies

You can see that HAProxy has written back three cookies used for session persistence. If you refresh these three pages repeatedly now, you will find they are always directed to *.srv1.
Next, delete the HA_STICKY_ms1 cookie, then visit ms1/demo.html again, and you will see

At the same time a new cookie has been written

If you find it is still directed to ms1.srv1 and no new HA_STICKY_ms1 cookie was written, then the browser may have cached the ms1/demo.html page and the request never reached HAProxy. Pressing F5 to refresh should fix it.
Building an L4 load balancer with HAProxy
When HAProxy works as an L4 load balancer, it does not parse anything related to the HTTP protocol and only processes packets at the transport layer. That is to say, HAProxy running in L4 mode cannot forward to different backends based on the URL, nor implement session persistence through cookies.
At the same time, HAProxy working in L4 mode cannot provide a statistics page either.
But HAProxy as an L4 load balancer can deliver higher performance, and is suitable for socket-based services (such as databases, message queues, RPC, mail services, Redis, etc.), or for HTTP services that do not need logical rule decisions and have already implemented session sharing.
Overall plan
In this example, we use HAProxy in L4 mode to proxy two HTTP services, without session persistence.
global
    daemon
    maxconn 30000   #ulimit -n must be at least 60018
    user ha
    pidfile /home/ha/haproxy/conf/haproxy.pid
    log 127.0.0.1 local0 info
    log 127.0.0.1 local1 warning

defaults
    mode tcp
    log global
    option tcplog            #enable tcplog
    timeout connect 5000ms
    timeout client 10000ms
    timeout server 10000ms   #in TCP mode, timeout client and timeout server should be set to the same value to prevent problems
    option httpchk GET /healthCheck.html    #define the default health check policy

frontend http-in
    bind *:9002
    maxconn 30000                    #define the maxconn on this port
    default_backend default_servers  #direct requests to the backend service group default_servers

backend default_servers    #define the backend service group default_servers
    balance roundrobin
    server def.srv1 192.168.8.111:8082 maxconn 300 check
    server def.srv2 192.168.8.112:8082 maxconn 300 check
Session persistence in L4 mode
Although HAProxy in TCP mode cannot implement session persistence through HTTP cookies, it can very conveniently implement session persistence based on the client IP. You only need to change
  balance roundrobin
to
    balance source
In addition, HAProxy provides a powerful stick-table feature: HAProxy can sample a large number of attributes from packets at the transport layer and write these attributes into the stick-table as the session persistence policy.
Detailed explanation of HAProxy’s key configuration
Overview
HAProxy’s configuration file has 5 sections
global: used to configure global parameters
default: used to configure the default attributes for all frontends and backends
frontend: used to configure frontend service (that is, the services HAProxy itself provides) instances
backend: used to configure groups of backend service (that is, the services behind HAProxy) instances
listen: a combined configuration of frontend + backend, which can be understood as a more concise way of configuring
Key configuration in the global section
daemon: specifies that HAProxy runs in background mode; this configuration should normally always be used
user [username] : specifies the user the HAProxy process belongs to
group [groupname] : specifies the user group the HAProxy process belongs to
log [address] [device] [maxlevel] [minlevel]: log output configuration, e.g. log 127.0.0.1 local0 info warning, which outputs info to warning level logs to local0 of the local rsyslog or syslog. The [minlevel] can be omitted. HAProxy has 8 log levels in total, from high to low: emerg/alert/crit/err/warning/notice/info/debug
pidfile : specifies the absolute path of the file that records the HAProxy process ID. Mainly used for stopping and restarting the HAProxy process.
maxconn : the number of connections the HAProxy process handles simultaneously; when the connection count reaches this value, HAProxy stops accepting connection requests
Key configuration in the frontend section
acl [name] [criterion] [flags] [operator] [value]: defines an ACL. An ACL is a true/false value computed from a specified attribute of a packet using a specified expression. For example, "acl url_ms1 path_beg -i /ms1/" defines an ACL named url_ms1 that is true when the request uri starts with /ms1/ (case-insensitive)
bind [ip]:[port]: the port the frontend service listens on
default_backend [name]: the default backend corresponding to the frontend
disabled: disable this frontend
http-request [operation] [condition]: policies applied to all HTTP requests arriving at this frontend; for example, you can reject them, require authentication, add headers, replace headers, define ACLs and so on.
http-response [operation] [condition]: policies applied to all HTTP responses returned from this frontend, roughly the same as above
log: same as the log configuration in the global section, applied only to this frontend. If you want to reuse the log configuration of the global section, configure it here as log global
maxconn: same as maxconn in the global section, applied only to this frontend
mode: the working mode of this frontend, mainly http and tcp, corresponding to the L7 and L4 load balancing modes
option forwardfor: add an X-Forwarded-For Header to requests to record the client ip
option http-keep-alive: provide services in KeepAlive mode
option httpclose: the counterpart of http-keep-alive, turning off KeepAlive mode. If HAProxy mainly provides interface-type services, you can consider using httpclose mode to save connection resources. But if you do so, the callers of the interface will not be able to use HTTP connection pooling
option httplog: enable httplog; HAProxy will record request logs in a format similar to Apache HTTP or Nginx
option tcplog: enable tcplog; HAProxy will record more transport-layer attributes of packets in the logs
stats uri [uri]: enable the statistics page on this frontend, accessed via [uri]
stats refresh [time]: statistics data refresh interval
stats auth [user]:[password]: authentication username and password for the statistics page
timeout client [time]: the timeout for the client continuing not to send data after the connection is created
timeout http-request [time]: the timeout for the client failing to send a complete HTTP request after the connection is created. Mainly used to prevent DoS-type attacks, that is, creating a connection and then sending request packets at a very slow rate, causing HAProxy connections to be occupied for a long time
use_backend [backend] if|unless [acl]: used together with ACLs; forward to the specified backend when the ACL is satisfied/not satisfied
Key configuration in the backend section
acl: same as the frontend section
balance [algorithm]: the load balancing algorithm among all servers under this backend; the commonly used ones are roundrobin and source. For the complete algorithm description see the official documentation configuration.html#4.2-balance
cookie: enables a cookie-based session persistence policy among the backend servers. The most commonly used is the insert method, e.g. cookie HA_STICKY_ms1 insert indirect nocache, which means HAProxy will insert a cookie named HA_STICKY_ms1 into the response, with the value specified in the corresponding server definition, and decide which server to forward to based on the value of this cookie in the request. indirect means that if the request already carries a valid HA_STICK_ms1 cookie, HAProxy will not insert this cookie into the response again; nocache means prohibiting all gateways and cache servers along the chain from caching responses that carry a Set-Cookie header.
default-server: used to specify the default settings for all servers under this backend. See the server configuration below for details.
disabled: disable this backend
http-request/http-response: same as the frontend section
log: same as the frontend section
mode: same as the frontend section
option forwardfor: same as the frontend section
option http-keep-alive: same as the frontend section
option httpclose: same as the frontend section
option httpchk [METHOD] [URL] [VERSION]: defines a health check policy performed in the http way. E.g. option httpchk GET /healthCheck.html HTTP/1.1
option httplog: same as the frontend section
option tcplog: same as the frontend section
server [name] [ip]:[port] [params]: defines a backend server in the backend. [params] is used to specify the parameters for this server; the commonly used ones include:
check: when this parameter is specified, HAProxy will perform health checks on this server, with the check method configured in option httpchk. You can also specify the inter, rise and fall parameters after check, representing the health check period, the number of consecutive successes before the server is considered UP, and the number of consecutive failures before the server is considered DOWN; the default values are inter 2000ms rise 2 fall 3
cookie [value]: used together with cookie-based session persistence. For example, cookie ms1.srv1 means requests handled by this server will have a cookie with the value ms1.srv1 written into the response (the specific cookie name is specified in the cookie setting in the backend section)
maxconn: the maximum number of connections HAProxy opens to this server at the same time; when the connection count reaches maxconn, new connections to this server enter a waiting queue. The default is 0, meaning unlimited
maxqueue: the length of the waiting queue; when the queue is full, subsequent requests will be sent to other servers under this backend. The default is 0, meaning unlimited
weight: the weight of the server, 0-256; the larger the weight, the more requests are distributed to this server. A server with weight 0 will not be assigned any new connections. All servers default to weight 1

timeout connect [time]: the timeout for HAProxy trying to establish a connection with the backend server
timeout check [time]: by default, the health check connection + response timeout is the inter value specified in the server command. If timeout check is configured, HAProxy will use inter as the connection timeout for health check requests, and the value of timeout check as the response timeout for health check requests
timeout server [time]: the timeout for the backend server to respond to HAProxy's requests
The default section
Among the key configurations of the frontend and backend sections described above, all except acl, bind, http-request, http-response and use_backend can be configured in the default section. If an item configured in the default section is not configured in the frontend or backend section, the configuration from the default section will be used.
The listen section
The listen section is a combination of the frontend and backend sections; all configurations from the frontend and backend sections can be configured under the listen section.
- Implementing HAProxy high availability with Keepalived
Although HAProxy is very stable, it still cannot avoid the risks brought by operating system failures, host hardware failures, network failures and even power loss. So a high availability solution must be implemented for HAProxy.
Below we introduce a HAProxy hot standby solution implemented with Keepalived. That is, two HAProxy instances on two hosts are online at the same time; the instance with the higher weight is the MASTER, and when the MASTER has a problem, the other instance automatically takes over all traffic.
Principle
A Keepalived instance runs on each of the two HAProxy hosts. These two Keepalived instances compete for the same virtual IP address, and the two HAProxy instances also try to bind to ports on this same virtual IP address.
Obviously, only one Keepalived can win this virtual IP at a time, and the HAProxy on the host whose Keepalived won the virtual IP is the current MASTER.
Keepalived internally maintains a weight value; the Keepalived instance with the highest weight value can win the virtual IP. At the same time, Keepalived periodically checks the HAProxy status on its own host, and when the status is OK the weight value increases.
Building a HAProxy active-standby cluster
Environment preparation
Install and configure HAProxy on two physical machines. In this example, two identical HAProxy setups will be installed on the two hosts 192.168.8.110 and 192.168.8.111. The specific steps are omitted; please refer to the section “Building an L7 load balancer with HAProxy”.
Installing Keepalived
Download, extract, compile, install:
wget http://www.keepalived.org/software/keepalived-1.2.19.tar.gz
tar -xzf keepalived-1.2.19.tar.gz
./configure --prefix=/usr/local/keepalived
make
make install
Register as a system service:
cp /usr/local/keepalived/sbin/keepalived /usr/sbin/
cp /usr/local/keepalived/etc/sysconfig/keepalived /etc/sysconfig/
cp /usr/local/keepalived/etc/rc.d/init.d/keepalived /etc/init.d/
chmod +x /etc/init.d/keepalived
Note: Keepalived needs to be installed and configured as the root user.
Configuring Keepalived
Create and edit the configuration file
mkdir -p /etc/keepalived/
cp /usr/local/keepalived/etc/keepalived/keepalived.conf /etc/keepalived/
vi /etc/keepalived/keepalived.conf
The content of the configuration file:
global_defs {
    router_id LVS_DEVEL  #virtual router name
}

#HAProxy health check configuration
vrrp_script chk_haproxy {
    script "killall -0 haproxy"  #use killall -0 to check whether the haproxy instance exists; better performance than the ps command
    interval 2   #script execution period
    weight 2   #weight added on each check
}

#virtual router configuration
vrrp_instance VI_1 {
    state MASTER           #state of this instance, MASTER/BACKUP; write BACKUP in the standby machine's configuration file
    interface enp0s25      #network card name of this machine; check it with the ifconfig command
    virtual_router_id 51   #virtual router number; keep it the same on the master and standby machines
    priority 101           #initial weight of this machine; for the standby machine write a value smaller than the master's (for example 100)
    advert_int 1           #period for competing for the virtual address, in seconds
    virtual_ipaddress {
        192.168.8.201      #virtual address IP; keep it the same on the master and standby machines
    }
    track_script {
        chk_haproxy        #the corresponding health check configuration
    }
}
If the host does not have the killall command, you need to install the psmisc package:
yum intall psmisc
Start both Keepalived instances separately
service keepalived start
Verification
After starting, first check on each of the two hosts who holds the virtual IP 192.168.8.201 by running the command:
ip addr sh enp0s25 (replace enp0s25 with the host's network card name)
The output of the host holding the virtual IP will look like this:

The output of the other host looks like this:

If you start the standby machine’s Keepalived first, then it is quite likely the virtual IP will be won by the standby machine, because the standby machine’s weight configuration is only 1 lower than the master’s; a single health check is enough to raise its weight to 102, higher than the master’s 101.
Now visit http://192.168.8.201:9001/ms1/demo.html and you can see the web page we deployed earlier.
Now check /var/log/haproxy.log and you can see that this request landed on the host that won the virtual IP.
Next, let’s stop the HAProxy instance on the current MASTER host (or the Keepalived instance, the effect is the same)
service haproxy stop
Visit http://192.168.8.201:9001/ms1/demo.html again and check the standby machine’s /var/log/haproxy.log; you will see the request landed on the standby machine, and the automatic master-standby switchover succeeded.
You can also run the ip addr sh enp0s25 command again and see that the virtual IP has been taken over by the standby machine.
In /var/log/message you can also see the switchover log output by keepalived:
Source: https://blog.csdn.net/xiaoxiaole0313/article/details/113977071