
A proxy server is mainly about this: when a user has a request for data on the Internet, the Proxy goes to the destination on the user’s behalf and fetches the data the user needs.
How the Proxy fetches information
- When the Proxy’s cache already holds the data the user wants
- The Client sends a data request packet to the Server.
- After the Server receives it, it first compares the source of this packet and the target website it intends to reach to see whether they are acceptable. If the source and the target are legitimate, or in other words, if the Proxy can help fetch data for both the source and the target website, then the Server will start fetching data on behalf of the Client.
- The Server first checks its own cached data. If it has the data the Client needs, it takes the data out without going through the process of requesting data from the Internet.
- Finally it sends the data to the Client.
- When the Proxy’s cache does not have the data the user wants
- The Client sends a data request packet to the Server.
- After the Server receives it, it starts comparing the data.
- When the Server finds that the cache does not hold the data the Client needs, it gets ready to go to the Internet to fetch the data.
- The Server starts sending requests to the Internet and obtaining the relevant data.
- Finally it sends the data back to the Client.
A Proxy server can serve as an upper-level proxy and play a certain role in distributing traffic. At present most Proxies are no longer open to the outside; they only provide services to users within their own network segment. If you want to set up a Proxy yourself, you need to look it up with the ISP you originally applied to, so that you can configure the server effectively. Otherwise, if you configure it incorrectly, the upper-level Proxy simply won’t provide any service.
Differences between a proxy server and a NAT server
What a NAT server does
NAT's main function is a way of using packet filtering together with iptables' nat table to perform IP masquerading (SNAT), letting clients go anywhere on the Internet on their own. Its main operating behavior is at layers 2, 3 and 4 of the OSI seven-layer protocol. Because it works through packet filtering and masquerading, the port numbers that clients can use (layer 4) are quite flexible.What a Proxy server does
The network proxy task is provided through the Proxy's service program (daemon), so whether the Proxy can carry out certain jobs depends on the features of that service program.
From the above we can see: a NAT server works by analyzing at a lower network layer. A Proxy, on the other hand, is mainly implemented through the features of a daemon, so it must satisfy that daemon’s requirements in order to implement certain features.
Uses, pros and cons of setting up a proxy server
Uses
- Act as an agent for retrieving WWW web page data.
- Act as a single-point outbound firewall system for an internal LAN.
Pros
- Save bandwidth on the single outbound connection and reduce network load.
- Fetch network data over a shorter path, giving the feel of a faster network.
- Achieve automatic traffic distribution with the help of an upper-level proxy server.
- Let computers inside the firewall get onto the Internet.
- Cons
- It is easy for people on the internal LAN to abuse.
- It requires fairly high configuration skills and troubleshooting work.
- It may fetch old, stale data.
Conditions for setting up a proxy server
- There are quite a few client users, and most of them only need the WWW network service.
- The Proxy also doubles as a firewall
- Clients often need to connect to websites with very slow transfer speeds.
- The sites clients often browse are static sites rather than dynamic ones
Setting up the Proxy
On CentOS I use the squid software; run the install in a command window
yum install squidGo into squid’s configuration directory (/etc/squid/) and you will see the following configuration files
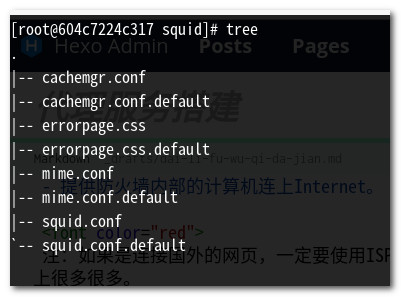
squid.conf is the main configuration file; all the settings squid needs are placed in this file
mime.conf sets which file formats on the Internet squid supports. The default configuration is enough, and it generally does not need to be changed.
/usr/sbin/squid provides the main squid program
/var/spool/squid the default squid cache storage directory
/usr/lib64/squid provides squid’s extra control modules
squid’s default characteristics on CentOS
- Only local sources can use this squid functionality.
- The Proxy service port squid listens on is port 3128.
- The cache directory is located at /var/spool/squid/, and there is only 100MB of disk cache.
- Besides the basic memory the squid program needs, it also provides 8MB of memory for caching popular files in memory.
- The user that starts the squid program by default is the squid account.
The squid.conf configuration file
     #
     # Recommended minimum configuration:
     #

     # Example rule allowing access from your local networks.
     # Adapt to list your (internal) IP networks from where browsing
     # should be allowed
     # trusted users and target control: define the external users (intranet) that may use the proxy
     acl localnet src 10.0.0.0/8    # RFC1918 possible internal network
     acl localnet src 172.16.0.0/12    # RFC1918 possible internal network
     acl localnet src 192.168.0.0/16    # RFC1918 possible internal network
     acl localnet src fc00::/7       # RFC 4193 local private network range
     acl localnet src fe80::/10      # RFC 4291 link-local (directly plugged) machines

     # define the ports from which data can be fetched
     acl SSL_ports port 443
     acl Safe_ports port 80        # http
     acl Safe_ports port 21        # ftp
     acl Safe_ports port 443        # https
     acl Safe_ports port 70        # gopher
     acl Safe_ports port 210        # wais
     acl Safe_ports port 1025-65535    # unregistered ports
     acl Safe_ports port 280        # http-mgmt
     acl Safe_ports port 488        # gss-http
     acl Safe_ports port 591        # filemaker
     acl Safe_ports port 777        # multiling http
     acl CONNECT method CONNECT

     #
     # Recommended minimum Access Permission configuration:
     #
     # Deny requests to certain unsafe ports
     # deny connection requests on irregular ports
     http_access deny !Safe_ports

     # Deny CONNECT to other than secure SSL ports
     # deny connection requests on irregular encrypted ports
     http_access deny CONNECT !SSL_ports

     # Only allow cachemgr access from localhost
     # allow the management feature for this machine
     http_access allow localhost manager

     # deny all other management sources
     http_access deny manager

     # We strongly recommend the following be uncommented to protect innocent
     # web applications running on the proxy server who think the only
     # one who can access services on "localhost" is a local user
     #http_access deny to_localhost

     #
     # INSERT YOUR OWN RULE(S) HERE TO ALLOW ACCESS FROM YOUR CLIENTS
     #

     # Example rule allowing access from your local networks.
     # Adapt localnet in the ACL section to list your (internal) IP networks
     # from where browsing should be allowed
     # allow user sources from the internal network
     http_access allow localnet

     # allow use from this machine
     http_access allow localhost

     auth_param basic program /usr/lib64/squid/basic_ncsa_auth /etc/squid/passwd
     auth_param basic children 5
     auth_param basic realm hehe
     auth_param basic credentialsttl 2 hours
     acl myproxy proxy_auth REQUIRED
     http_access allow myproxy

     # And finally deny all other access to this proxy
     # deny everything
     http_access deny all

     # Squid normally listens to port 3128
     # the port that clients' requests are listened on by default
     http_port 3128

     # Uncomment and adjust the following to add a disk cache directory.
     # disk cache: the directory where cached data is placed and its related settings
     cache_dir ufs /var/spool/squid 100 16 256

     # Leave coredumps in the first cache dir
     coredump_dir /var/spool/squid

     #hide the real IP and turn it into an anonymous ip
     via off
     forwarded_for delete
     #
     # Add any of your own refresh_pattern entries above these.
     #
     refresh_pattern ^ftp:        1440    20%    10080
     refresh_pattern ^gopher:    1440    0%    1440
     refresh_pattern -i (/cgi-bin/|\?) 0    0%    0
     refresh_pattern .        0    20%    4320
Once the above is configured, stop squid
systemctl stop squid.service
Initialize the cache
squid -z
Start squid
systemctl start squid.service
Make squid start on boot
systemctl enable squid.service
I won’t go into adding password authentication; if you want to verify whether it worked, you can test it through a browser proxy or a local proxy.